 By Natalie
In this recipe
Why You’ll Love This Dish
If you’re looking for a dessert that wows without requiring the oven, the Swiss Roll Layered No Bake Dessert is your answer. Combining the nostalgic flavors of Swiss rolls with a creamy, rich texture, this dessert is perfect for gatherings, parties, or even just a cozy family night. What makes this recipe truly special is its lightness and how quickly it comes together. You can prepare it in less than 30 minutes and refrigerate it until you’re ready to serve, making it a hassle-free option that will impress your friends and family. You may also find Cannoli Cream Pie No Bake Dessert Dream useful.
“This Swiss Roll Layered No Bake Dessert came together easily and disappeared just as fast! A definite hit at our family reunion.”
Anyone can whip this up, and even the kids can get involved in layering the components. Plus, if you enjoy desserts like chocolate lasagna or banana split desserts, this recipe fits right into your sweet repertoire.
How This Recipe Comes Together
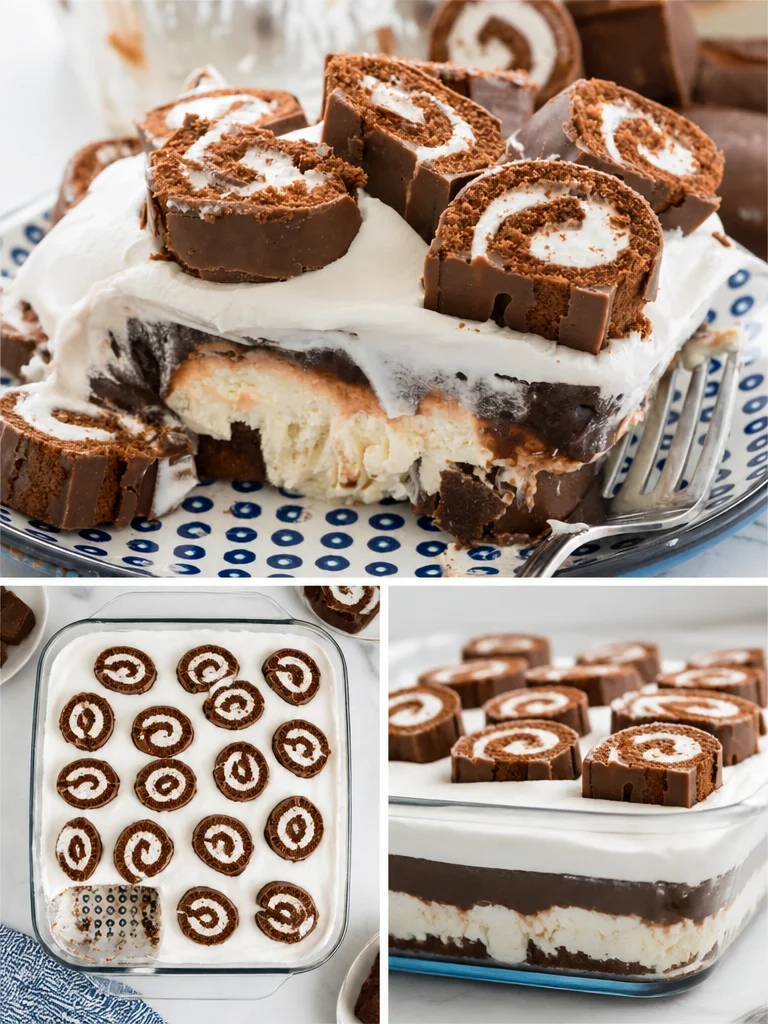
This Swiss Roll Layered No Bake Dessert is not only delicious but also simple to assemble. Here’s a quick overview of what to expect: you’ll be layering Swiss rolls, a luscious cream cheese mixture, and a rich chocolate pudding topped with whipped cream. Each layer creates a delightful harmony of flavors and textures that will keep your taste buds dancing.
What You’ll Need
Here’s what you’ll need to gather before you start:
- 15 Swiss Rolls or Ho-hos
- 8 ounces cream cheese, softened
- 1/4 cup granulated sugar
- 1 teaspoon vanilla extract
- 1 8-ounce container Cool Whip, thawed
- 1 3.4-ounce box instant chocolate pudding
- 1 1/2 cups milk
Feel free to explore substitutions, such as using low-fat cream cheese or a dairy-free alternative if you have dietary preferences.
Directions
- Unwrap about 10 or 11 of the Swiss Rolls, then cut each roll into 5 pieces.
- Line the bottom of a 9×9 inch pan with the slices of Swiss Roll.
- In a mixing bowl, beat together the cream cheese, sugar, and vanilla extract until smooth.
- Fold in about half of the thinned Cool Whip (around 1 1/2 cups) and spread it evenly over the Swiss Roll slices.
- In another bowl, whisk together the pudding mix and milk; allow it to sit for a few minutes until it thickens.
- Once thickened, spread the pudding layer evenly over the cream cheese layer.
- Top with the remaining Cool Whip, smoothing it out as needed.
- Cover and chill the dessert in the refrigerator for at least 4 hours before serving.
- Prior to serving, garnish with extra slices of Swiss Rolls if desired.
Best Ways to Enjoy It
To serve this delightful dessert, cut it into squares and present it on a decorative platter. Consider pairing it with fresh berries or a scoop of vanilla ice cream for an irresistible combination. Add a sprig of mint on top for a touch of color that also enhances the presentation.
Common Questions
How much prep time is involved?
The total prep time for this dessert is approximately 30 minutes, though it requires chilling for at least 4 hours.
Can I make it a day in advance?
Absolutely! In fact, making it the day before allows the flavors to meld beautifully.
Are there any allergy concerns?
This dessert contains dairy and gluten, so if you’re catering to specific dietary restrictions, consider using gluten-free Swiss rolls and dairy-free alternatives.
Conclusion
The Swiss Roll Layered No Bake Dessert is a must-try for any sweet lovers out there. With its easy assembly and rich flavors, you’re sure to enjoy every bite. If you’re intrigued by other no-bake desserts, check out these links: Swiss Roll Layered No Bake Dessert – Crazy for Crust, Swiss Cake Roll Cake (No-Bake) – The Country Cook, and No Bake Cherry Swiss Roll Cake – Inside BruCrew Life. Enjoy creating this delightful dessert for your next gathering!
Swiss Roll Layered No Bake Dessert
Ingredients
Method
- Unwrap about 10 or 11 of the Swiss Rolls, then cut each roll into 5 pieces.
- Line the bottom of a 9x9 inch pan with the slices of Swiss Roll.
- In a mixing bowl, beat together the cream cheese, sugar, and vanilla extract until smooth.
- Fold in about half of the thinned Cool Whip and spread it evenly over the Swiss Roll slices.
- In another bowl, whisk together the pudding mix and milk; allow it to sit for a few minutes until it thickens.
- Once thickened, spread the pudding layer evenly over the cream cheese layer.
- Top with the remaining Cool Whip, smoothing it out as needed.
- Cover and chill the dessert in the refrigerator for at least 4 hours before serving.
- Prior to serving, garnish with extra slices of Swiss Rolls if desired.