Cheesy Taco Sticks
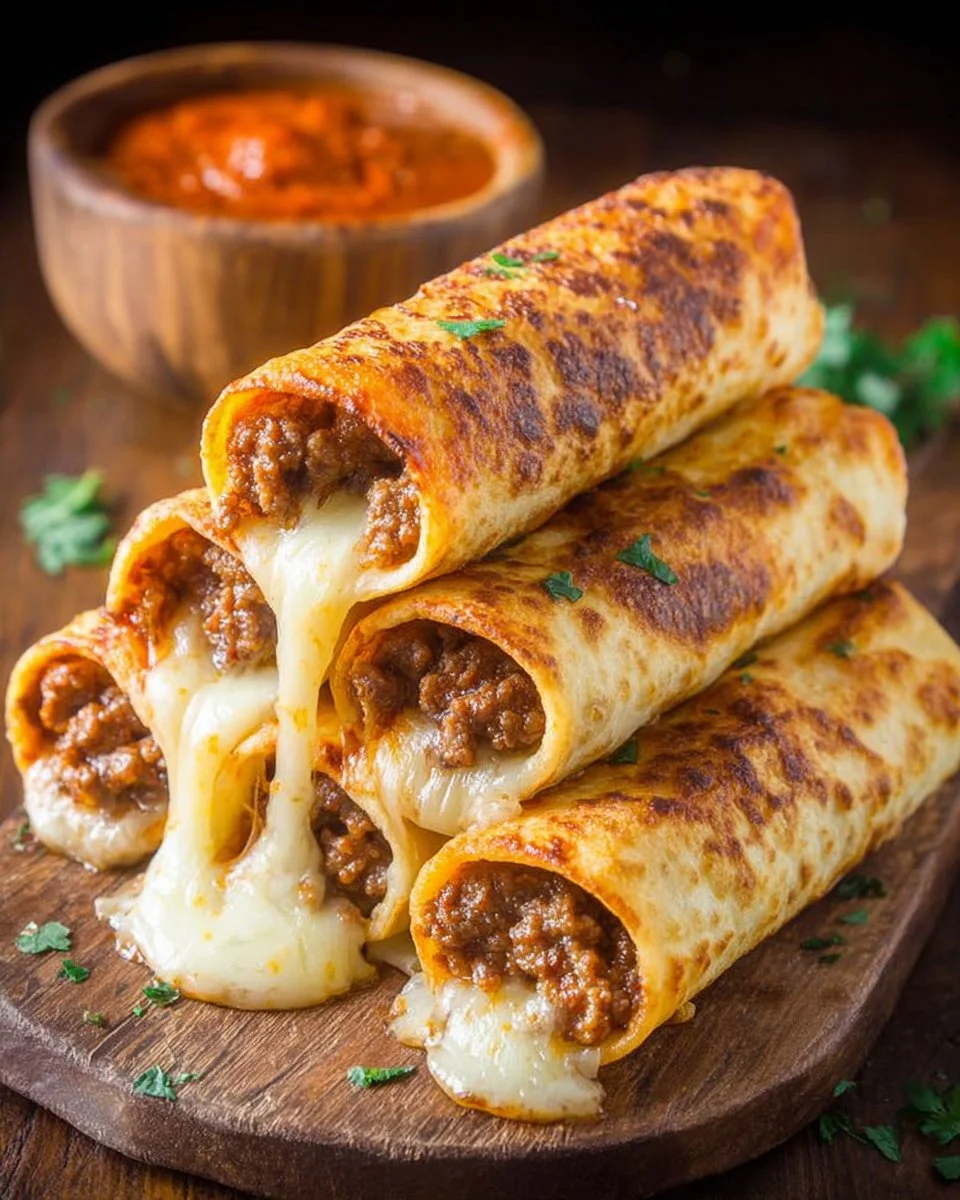

A Tasty Twist on Taco Night
If you’re in search of a fun twist on classic tacos, Cheesy Taco Sticks are here to become your new favorite! Picture this: crispy pizza dough rolled around seasoned ground beef and gooey cheese, creating bite-sized delights perfect for snacking or dipping. They come together quickly and are ideal for busy weeknights, game day gatherings, or even a family movie night. Trust me; once you serve these cheesy treats, your loved ones will be clamoring for seconds!
“These Cheesy Taco Sticks were a hit at our game night! Everyone loved the flavors, and I loved how easy they were to make!” – A satisfied home cook
What Makes This Dish Shine
Thinking about making Cheesy Taco Sticks? Here’s why you should dive in. First, they’re incredibly quick to whip up, making them perfect for those hectic evenings when you want something delicious without spending hours in the kitchen. Not to mention, these treats are budget-friendly, using simple ingredients you likely already have on hand. Plus, they’re a surefire hit with kids and adults alike, offering a unique fusion of flavors that keep everyone coming back for more.
Imagine enjoying these on a Friday night, where you can customize each stick to suit individual preferences. This recipe truly makes taco night special, elevating it with a fun, shareable twist.
Preparing Cheesy Taco Sticks: A Step-by-Step Overview
Making Cheesy Taco Sticks is a breeze! You’ll start by browning the ground beef and mixing in taco seasoning, then assemble these cheesy parcels with pizza dough. Follow these steps, and you’ll have a delightful snack in no time.
Preheat and prepare: Preheat your oven to 425°F. Don’t forget to lightly coat a large baking sheet with nonstick spray to prevent sticking!
Cook the beef: Brown the ground beef in a skillet over medium high heat until fully cooked, then mix in the taco seasoning and let it cool a bit.
Shape the sticks: Roll out the pizza dough into a rectangle and slice it into 10 small rectangles. Spoon the taco meat onto each piece, add a half cheese stick, and roll them up tightly.
Brush and bake: Combine melted butter, garlic powder, and parsley; brush this flavorful mixture over each taco stick. Arrange them on the baking sheet and pop them in the oven for about 10-12 minutes until golden brown.
Serve: Allow them to cool for a minute before serving, and get ready to enjoy!
What You’ll Need


Gather these ingredients to create your Cheesy Taco Sticks:
- Ground beef (at least 85% lean)
- Taco seasoning mix (homemade or store-bought)
- Pizza dough (Pillsbury tube or fresh bakery dough)
- Colby Jack and cheddar cheese sticks
- Real butter
- Garlic powder
- Dried parsley
If you’re looking to spice it up, consider substituting ground turkey or adding your favorite veggies to the beef mixture.
Directions to Follow
- Preheat your oven to 425°F and prepare a large baking sheet with nonstick spray.
- In a skillet over medium high heat, brown the ground beef until fully cooked. Drain any excess fat.
- Mix in the taco seasoning and let the mixture cool.
- Roll out the pizza dough into a rectangle and slice it into ten small rectangles.
- Spoon a portion of the taco meat onto each rectangle, top with half of a cheese stick, then roll them up tightly.
- In a small bowl, mix melted butter, garlic powder, and parsley together. Brush this mixture over each rolled taco stick.
- Place the taco sticks on the prepared baking sheet and bake for 10-12 minutes, or until golden brown.
- Let the taco sticks cool for a minute before serving.
Best Ways to Enjoy It
These Cheesy Taco Sticks are delicious on their own, but why stop there? Serve them with a side of your favorite salsa or guacamole for an extra burst of flavor. Consider pairing them with a fresh salad or crispy tortilla chips for a complete meal. For a fun twist, offer various dipping sauces like ranch, sour cream, or even a spicy chipotle mayo.
Keeping Leftovers Fresh
To store any leftovers, let the taco sticks cool completely and then place them in an airtight container. They can be kept in the fridge for up to three days. To reheat, simply pop them in the oven at 350°F for about 10 minutes or until heated through. You can also freeze the uncooked sticks for up to two months. Just roll them up, place them in a single layer on a baking sheet until frozen, then transfer them to a freezer bag. Bake directly from frozen when you’re ready to enjoy!
Helpful Cooking Tips
- Lean meat: For a healthier version, use ground turkey or chicken instead, or even a meat substitute for a vegetarian option.
- Customization: Don’t be afraid to add extra fillings! Chopped bell peppers or onions can add a nice crunch to the mixture.
- Bake for crispiness: For an extra crispy exterior, brush the dough with butter before baking and sprinkle with a little extra garlic powder.
Creative Twists to Try
Feel free to experiment with flavors to make these Cheesy Taco Sticks your own! Try adding cooked black beans or corn for added texture and taste. You could also swap the cheese for pepper jack for a spicy kick or incorporate different herbs and spices based on your preference. For those who love a crunch, consider topping them with crushed tortilla chips right before baking.
FAQ
Can I make these in advance?
Absolutely! You can assemble the Cheesy Taco Sticks ahead of time and store them in the refrigerator for up to a day before baking. Just remember to add a few extra minutes to the baking time if they’re cold.
What’s the prep time for these?
The prep time usually takes about 15 minutes, and baking takes around 10-12 minutes, so you can have them ready in less than half an hour!
Can these be frozen?
Yes! You can freeze the uncooked rolls. Just make sure to place them in a single layer on a baking sheet until solid, then transfer to a freezer bag. They are best enjoyed within two months of freezing.
What can I substitute for taco seasoning?
If you don’t have taco seasoning on hand, you can easily make your own with spices like chili powder, cumin, garlic powder, onion powder, paprika, and salt.
Ready to dive into Cheesy Taco Sticks? This recipe promises a delightful experience that everyone will savor! Enjoy your cooking adventure!

Cheesy Taco Sticks
Ingredients
Method
- Preheat your oven to 425°F and prepare a large baking sheet with nonstick spray.
- In a skillet over medium high heat, brown the ground beef until fully cooked. Drain any excess fat.
- Mix in the taco seasoning and let the mixture cool.
- Roll out the pizza dough into a rectangle and slice it into ten small rectangles.
- Spoon a portion of the taco meat onto each rectangle, top with half of a cheese stick, then roll them up tightly.
- In a small bowl, mix melted butter, garlic powder, and parsley together. Brush this mixture over each rolled taco stick.
- Place the taco sticks on the prepared baking sheet and bake for 10-12 minutes, or until golden brown.
- Let the taco sticks cool for a minute before serving.


