Red Lobster Garlic Cheese Biscuits (Self-Rising Flour)
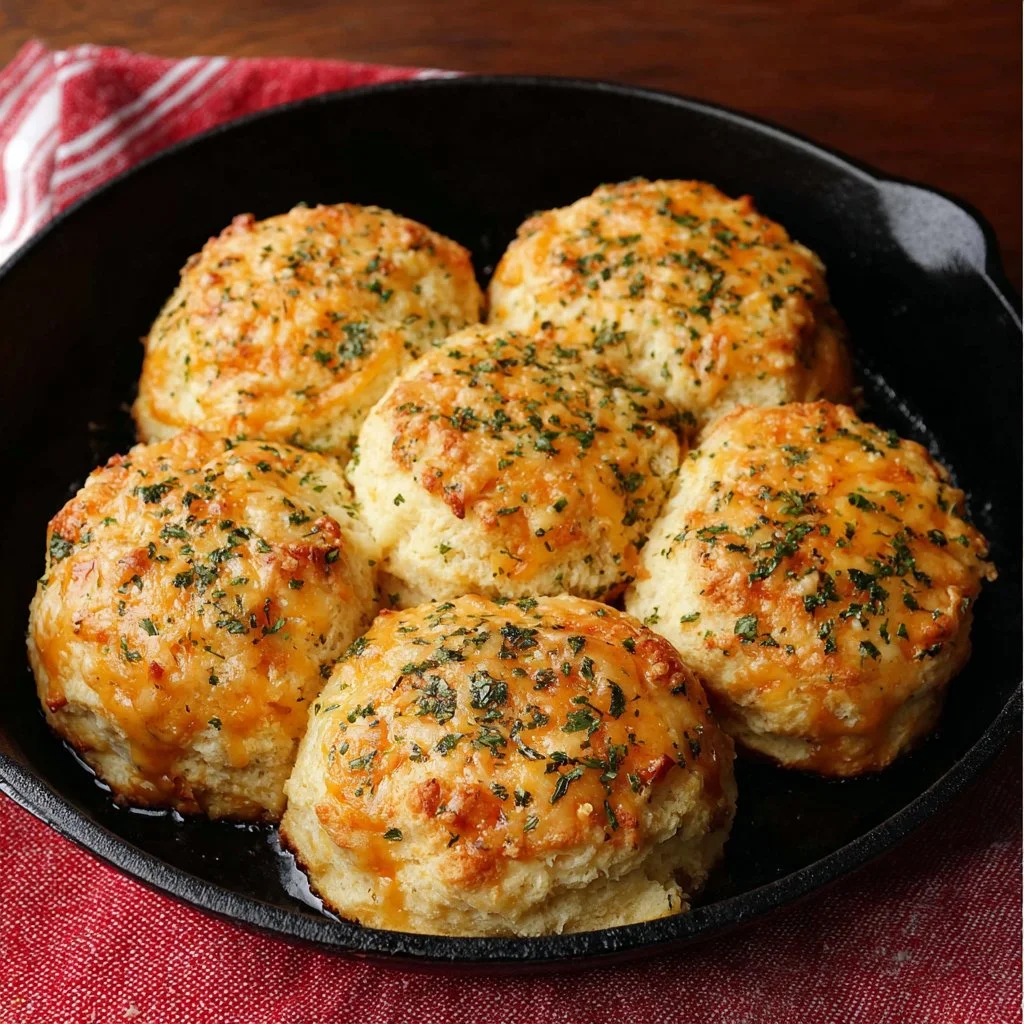

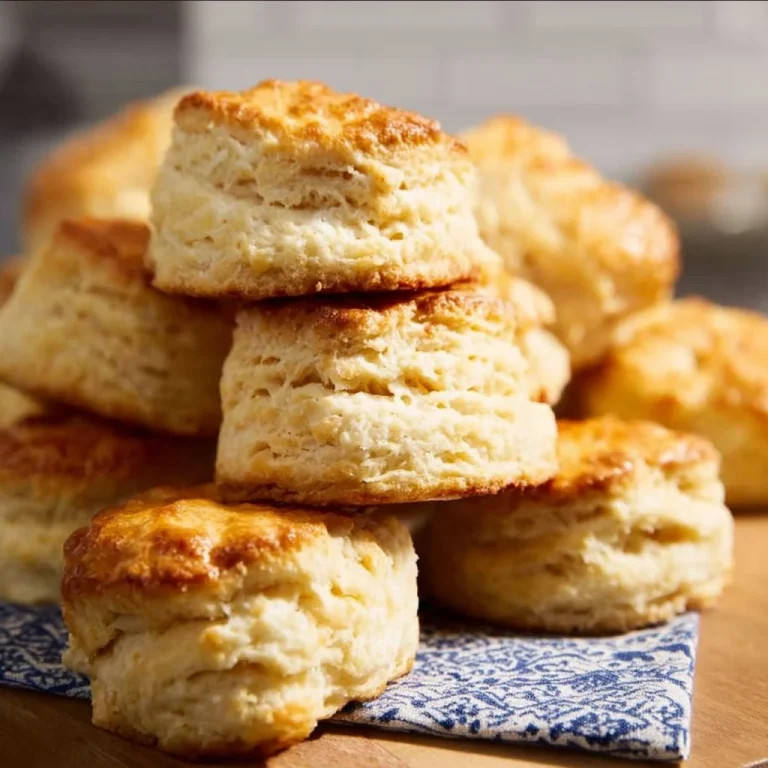
I still remember the first time I ripped into a warm, flaky cheddar biscuit from a Red Lobster copycat — that garlic-butter pull, the salty cheddar streaks, the soft interior that soaks up soup and sauce. This homemade version using self-rising flour is fast, dependable, and keeps that restaurant-style charm without mystery ingredients or long prep. It’s perfect for weeknight dinners, weekend brunches, or whenever you want a buttery, cheese-forward side that kids and adults both fight over. If you like pairing rich biscuits with seafood, try it alongside this Garlic Shrimp Alfredo for a decadent meal.
Why you’ll love this dish
These biscuits hit several sweet spots: they’re quick (no yeast), use pantry-friendly self-rising flour, and come together with a handful of simple ingredients. Grating frozen butter gives layers and flakiness without a pastry cutter, and finishing with garlicky melted butter is what makes them taste “Red Lobster” authentic.
“Buttery, garlicky, and cheesy — every bite tastes like the restaurant version, but better because you made it.”
Reasons to try it now:
- Fast bake time (12–15 minutes) for last-minute sides.
- Budget-friendly ingredients — cheddar, butter, and self-rising flour.
- Kid-approved: cheesy, tender, and easy to dunk in soups or sauces.
- Makes a great vehicle for leftover seafood or a weekend brunch spread.
How this recipe comes together
Before you dive in, here’s a quick overview of the process so you know what to expect:
- Chill the bowl and grate frozen butter for flaky texture.
- Mix self-rising flour with garlic powder and Old Bay for savory base flavor.
- Fold in grated cold butter and shredded cheddar.
- Add milk just until combined — don’t overwork the dough.
- Scoop into a preheated cast-iron skillet and bake until golden.
- Brush warm biscuits with garlic-parsley butter right out of the oven.
This simple flow keeps the biscuits tender inside and crisp on the outside.
What you’ll need
- 2 cups self-rising flour (if you don’t have it: 2 cups all-purpose flour + 1 tbsp baking powder + 1/2 tsp salt)
- 1/2 stick (4 tbsp) butter, frozen & grated (unsalted recommended)
- 1 cup cheddar cheese, shredded, plus extra for tops
- 3/4 cup milk (whole milk or buttermilk recommended for richness)
- 1 tsp garlic powder (in dough)
- 1/2 tsp Old Bay seasoning
- 1 tbsp oil (to season the cast-iron skillet)
- 2 tbsp butter, melted (for brushing)
- 1/4 tsp garlic powder (for the butter brush)
- 1/2 tsp dried parsley
Notes/substitutions:
- Cheese: sharp cheddar gives more bite; mild cheddar is creamier. Mix in half mozzarella for extra chew.
- Milk: buttermilk yields tang and tenderness; plain whole milk works fine.
- Butter: freezing and grating the butter is the key to flaky layers; you can pulse cold butter into flour with a pastry cutter or food processor if needed.
Step-by-step instructions


- Chill tools and butter. Place a large mixing bowl, box grater, and the stick of butter in the freezer for 15–30 minutes. This keeps the butter cold while you grate it.
- Preheat oven and skillet. Heat oven to 425°F. Put a 10-inch cast-iron skillet into the oven to preheat.
- Combine dry ingredients. In the chilled mixing bowl, whisk together 2 cups self-rising flour, 1 tsp garlic powder, and 1/2 tsp Old Bay. Set aside.
- Grate the butter. Use the chilled box grater to grate the frozen butter directly into the flour. If you don’t have a grater, cut cold butter into small cubes and use a pastry cutter.
- Add cheese. Stir the grated butter into the flour until evenly distributed. Fold in 1 cup shredded cheddar.
- Add milk. Pour in all but a tablespoon or two of the 3/4 cup milk. Stir gently until the dough just comes together. Stop mixing as soon as you don’t see loose flour — overmixing makes tough biscuits.
- Oil the skillet. Carefully remove the hot cast iron from the oven and rub the inside with 1 tbsp oil to coat bottom and sides.
- Scoop biscuits. Use a large cookie scoop to portion out 6 large biscuits into the oiled skillet. Sprinkle extra shredded cheddar on top, if desired.
- Bake. Place skillet in the oven and bake 12–15 minutes, until biscuits are puffed and the tops are golden brown.
- Make garlic butter. Five minutes before the biscuits are done, melt 2 tbsp butter and stir in 1/4 tsp garlic powder and 1/2 tsp dried parsley.
- Brush and serve. When the biscuits come out of the oven, immediately brush the tops with the garlic-parsley butter. Serve warm.
Pro tip: work quickly when handling the dough and keep hands cool. Warm hands melt the butter and reduce flakiness.
Best ways to enjoy it
These biscuits shine as a side or snack:
- Pair with seafood (like crab or shrimp) or a creamy chowder.
- Slice or pull apart and top with extra melted butter and chopped herbs.
- Serve with a small ramekin of garlic butter or marinara for dipping.
- Build a breakfast sandwich with scrambled eggs and bacon for brunch.
For a surf-and-turf themed dinner, serve alongside this Air Fryer Lobster Tails with Garlic Butter — the garlic-cheddar biscuits soak up the buttery sauce beautifully.
Storage and reheating tips
- Room temperature: Store cooled biscuits in an airtight container for up to 2 days.
- Refrigerator: Keep in a sealed container up to 5 days.
- Freezing cooked biscuits: Wrap biscuits individually in plastic wrap, then place in a freezer-safe bag for up to 3 months. Reheat from frozen at 350°F for 12–15 minutes, or thaw overnight and warm for 8–10 minutes.
- Freezing unbaked dough: Scoop biscuits onto a parchment-lined tray and freeze until solid. Transfer to a bag and bake from frozen, adding a few extra minutes to bake time.
- Reheat tip: For best texture, reheat under the broiler for 1–2 minutes or in a 350°F oven for 6–8 minutes. Microwave will soften them quickly but can make them gummy.
Food safety: cool biscuits to room temperature before sealing for storage. Don’t keep perishable dairy-based foods at room temperature for more than two hours.
Pro chef tips
- Keep everything cold. Cold butter is non-negotiable for flaky layers. Chill tools and the butter before grating.
- Don’t overmix. Stir until the dough just comes together. A little lumpiness is fine.
- Use a hot skillet. Preheating the cast-iron gives a crisp bottom crust and helps the biscuits rise evenly.
- Portion uniformly. A large cookie scoop makes even biscuits so they bake at the same rate.
- Add mix-ins sparingly. Extra add-ins (like jalapeños or sun-dried tomatoes) should be small and evenly distributed so the dough sets uniformly.
- Want a crunchier top? Broil for 30–60 seconds at the end, watching carefully.
If you like bold breakfast combos, try these biscuits with an Ultra-Crispy Bacon and Cheese Toastie twist — chopped bacon folded into the dough is irresistible.
Flavor swaps
- Herb & Parmesan: Replace half the cheddar with grated Parmesan and add 1 tsp chopped fresh rosemary or thyme.
- Spicy cheddar: Mix in 1–2 tbsp diced pickled jalapeños and use pepper jack instead of mild cheddar.
- Garlic lovers: Add 1–2 minced cloves fresh garlic to the melted butter for brushing.
- Gluten-free: Use a self-rising gluten-free flour blend that specifies 1:1 substitution for biscuits.
- Smaller biscuits: Use a medium cookie scoop to make 8–10 smaller biscuits; reduce bake time by a few minutes.
Your questions answered
Q: How long does this take from start to finish?
A: About 30–40 minutes total: 15–30 minutes chilling time, 10 minutes active prep, and 12–15 minutes baking.
Q: Can I use all-purpose flour instead of self-rising flour?
A: Yes. For every 2 cups all-purpose flour, add 1 tbsp baking powder and 1/2 tsp salt to mimic self-rising flour.
Q: Can I prepare these ahead and bake later?
A: Yes. Scoop the biscuits into the skillet, cover tightly, and refrigerate for up to 24 hours. Bake straight from chilled, adding a few minutes if needed. You can also freeze unbaked scoops and bake from frozen with extra minutes.
Q: How do I make these less greasy?
A: Use unsalted butter and pat excess melted butter off the finished tops with a paper towel if needed. Also ensure you don’t over-brush — the butter finish is meant to be glossy and flavorful, not oily.
Q: Can I make these dairy-free?
A: Swap dairy butter for a high-quality vegan butter and use a dairy-free cheddar alternative. Texture will vary; chilled vegan butter is still important.
Conclusion
If you want an easy copycat that captures the cheesy, garlicky magic of restaurant biscuits, this self-rising flour version delivers every time. For another take on home-style cheddar-bay biscuits and to compare techniques, see this detailed Homemade Cheddar Bay Biscuits guide. For the original inspiration and a slightly different ingredient twist, check out this faithful copycat on Red Lobster Garlic Cheese Biscuits (Self-Rising Flour).

Cheddar Bay Biscuits
Ingredients
Method
- Chill tools and butter: Place a large mixing bowl, box grater, and the stick of butter in the freezer for 15–30 minutes.
- Preheat oven and skillet: Heat oven to 425°F. Put a 10-inch cast-iron skillet into the oven to preheat.
- Combine dry ingredients: In the chilled mixing bowl, whisk together self-rising flour, garlic powder, and Old Bay seasoning. Set aside.
- Grate the butter: Use the chilled box grater to grate the frozen butter directly into the flour.
- Add cheese: Stir the grated butter into the flour until evenly distributed. Fold in shredded cheddar.
- Add milk: Pour in all but a tablespoon of the milk. Stir gently until the dough just comes together.
- Oil the skillet: Carefully remove the hot cast iron from the oven and rub the inside with oil to coat.
- Scoop biscuits: Use a large cookie scoop to portion out 6 large biscuits into the oiled skillet. Sprinkle extra cheddar on top if desired.
- Bake the biscuits in the oven for 12–15 minutes, until puffed and tops are golden brown.
- Make garlic butter: Five minutes before biscuits are done, melt butter and stir in garlic powder and dried parsley.
- Brush and serve: When biscuits come out of the oven, immediately brush tops with garlic-parsley butter and serve warm.

