Homemade Baked Chicken Tenders


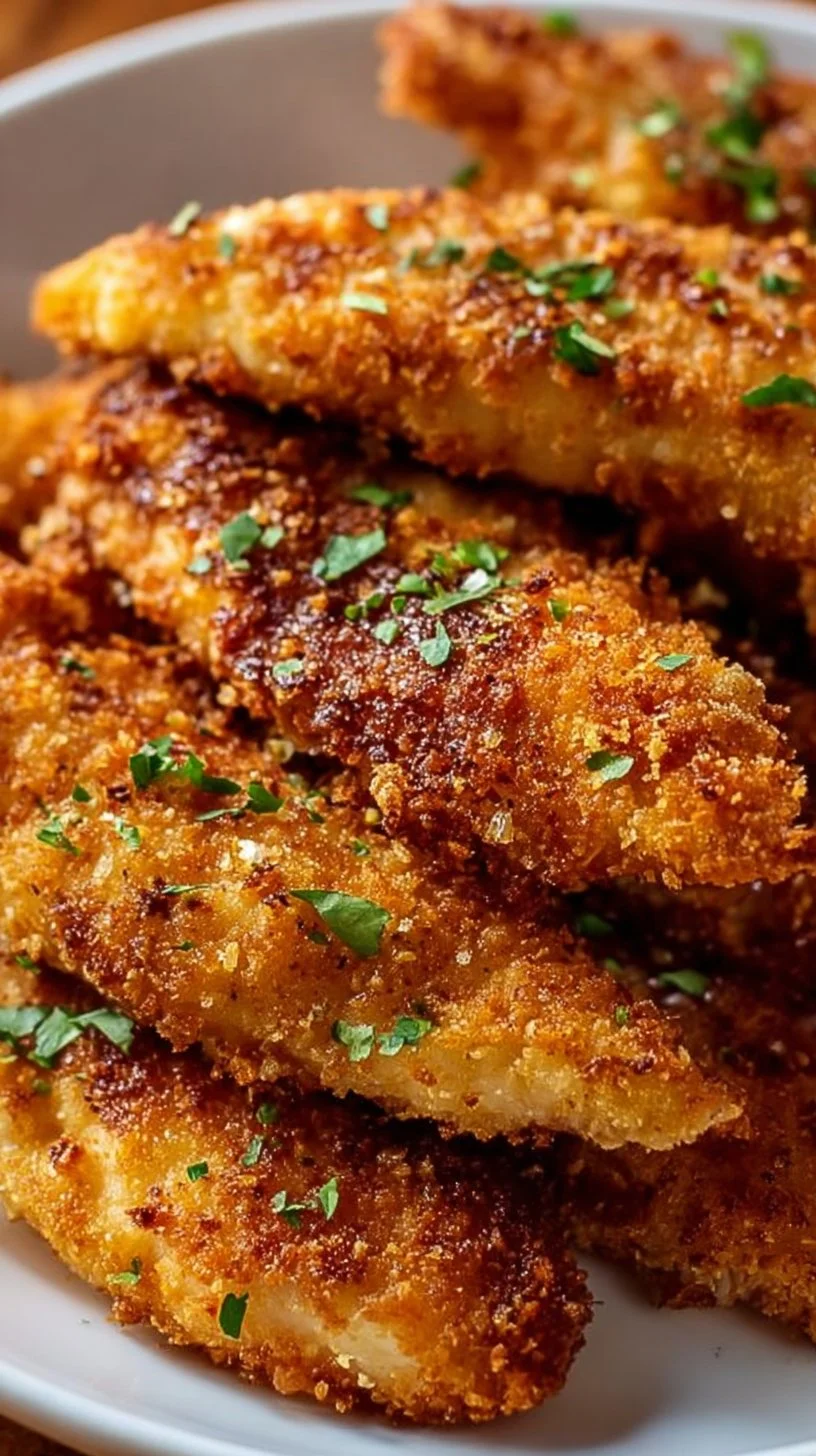
I still remember the first time I baked these chicken tenders instead of frying them — the house smelled like comfort food but without the greasy aftermath. These are crispy, kid-friendly strips of chicken that are easy enough for a weeknight and impressive enough for casual guests. If you want a simple, reliable way to get golden, juicy tenders from basic pantry ingredients, this is it. For another take on oven-baked tenders from this site, see homemade baked chicken tenders.
What makes this recipe special
This recipe balances simplicity and texture. With a classic three-step breading (flour → egg → seasoned breadcrumbs) and a short bake at 400°F (200°C), you get a crisp crust and moist interior without deep-frying. It’s budget-friendly, kid-approved, and fast — perfect for busy evenings or batch-cooking for lunches.
“Crunchy outside, juicy inside — the whole family went back for seconds. Easy to scale and great with every dipping sauce we tried.”
Why people make it:
- Fast: about 30–40 minutes from start to finish.
- Flexible: easy to tweak seasoning and coatings.
- Lower-fat than frying: a light spray of oil gives a golden crust without deep-frying.
- Crowd-pleaser: works for kids, dinners, game days, and meal prep.
How this recipe comes together
Step-by-step overview
- Trim and slice the chicken into even strips so everything cooks at the same rate.
- Set up three shallow bowls for flour, beaten egg, and seasoned breadcrumbs.
- Dredge each strip in flour, dunk in egg, then press into breadcrumbs to form an even coat.
- Arrange on a parchment-lined baking sheet, lightly oil the tops, and bake at 400°F (200°C).
- Flip halfway for even browning and finish when the internal temperature reaches 165°F (74°C). Let rest a few minutes before serving.
This short roadmap helps you move quickly when you start — the actual hands-on time is minimal once your breading station is ready.
What you’ll need
Key ingredients
- 1 pound chicken breast, sliced into strips (about 8–10 tenders)
- 1 cup breadcrumbs (panko for extra crunch)
- 1/2 cup all-purpose flour
- 2 eggs, beaten
- 1 teaspoon garlic powder
- 1 teaspoon paprika
- Salt and pepper, to taste
- Cooking spray or olive oil (for a light drizzle)
Notes and substitutions:
- For extra crunch use panko breadcrumbs; for gluten-free, substitute a GF flour and GF breadcrumbs.
- Swap paprika for smoked paprika or cayenne to change the flavor profile.
- If you like a richer coating, mix in 2 tbsp grated Parmesan with the breadcrumbs.
- For a sweet-savory twist, see a different flavor riff like this bacon brown sugar chicken tenders.
How to prepare it


Step-by-step instructions
- Preheat the oven to 400°F (200°C). Line a baking sheet with parchment paper and set a rack if you have one — that helps air circulate and keeps the underside crisp.
- Set up the breading station: place the flour in one shallow bowl, beaten eggs in another, and mix breadcrumbs with garlic powder, paprika, salt, and pepper in a third.
- Pat the chicken strips dry with paper towels so the coating adheres. Dredge each strip in flour, shaking off excess.
- Dip the floured strip into the beaten eggs, letting the extra drip off.
- Press the strip into the breadcrumb mixture until evenly coated. Place the coated tenders in a single layer on the prepared sheet, leaving small gaps between pieces.
- Lightly spray the tenders with cooking spray or drizzle with a little olive oil — this promotes browning.
- Bake for 20–25 minutes, flipping once about halfway through, until golden and the internal temperature reaches 165°F (74°C). If using thinner strips, start checking at 18 minutes.
- Let tenders rest for 3–5 minutes before serving to redistribute juices.
Short, action-oriented steps keep the process moving and reduce over-handling the chicken.
Serving suggestions
Serving suggestions
- Classic: pair with honey mustard, ranch, or barbecue sauce. Place tenders on a platter with small bowls of sauces for dipping.
- Family meal: serve over mashed potatoes or next to oven-roasted vegetables for an easy dinner.
- Lunchbox idea: slice and add to a wrap with shredded lettuce, sliced tomato, and a smear of mayo.
- Party platter: make sliders using mini buns, pickles, and a swipe of spicy mayo.
For crisp reheated tenders that taste fresh, see air-fryer reheating tips later on.
Storage and reheating tips
Keeping leftovers fresh
- Refrigerate: Store cooked tenders in an airtight container in the fridge for 3–4 days. Cool them to room temperature (no more than 2 hours) before refrigerating.
- Freeze: Arrange cooled tenders on a sheet, freeze until firm, then transfer to a freezer bag. Freeze up to 3 months. Thaw in the fridge overnight before reheating.
- Reheating: For best texture, reheat in a 375°F (190°C) oven for 8–12 minutes until hot and crisp. An air fryer at 350°F for 4–6 minutes works great to restore crunch quickly. Microwaving is faster but will soften the crust.
Food safety: always reheat to at least 165°F (74°C) internal temperature before serving.
Pro chef tips
Helpful cooking tips
- Even sizes matter: cut tenders to roughly the same thickness so they cook evenly. Pound thicker pieces lightly if needed.
- Dry the chicken: removing surface moisture helps the flour adhere and creates a better crust.
- Season every layer: lightly salt the flour and breadcrumbs — seasoning only the final coating can leave the center bland.
- Don’t overcrowd the pan: leave space between tenders so hot air circulates and they brown instead of steam.
- Use a wire rack on the sheet: elevating tenders creates air flow and a crisp bottom without turning.
- Check doneness with a thermometer: visual cues are useful, but 165°F (74°C) is the safe internal temp for poultry.
Different ways to try it
Recipe variations
- Spicy Buffalo: add 1/2–1 tsp cayenne to the breadcrumbs and toss finished tenders in warmed buffalo sauce.
- Herb-Panko: fold chopped fresh parsley, thyme, and lemon zest into panko for a bright crust.
- Parmesan crust: mix 2–3 tbsp grated Parmesan into breadcrumbs for a nutty finish.
- Gluten-free: use almond flour or a gluten-free flour blend for dredging and GF panko for the crumbs.
- Air-fryer version: to skip the oven, coat as directed and air-fry at 400°F (200°C) for 8–10 minutes, flipping halfway — see an air-fryer take on naked tenders here for technique inspiration.
Your questions answered
FAQ
Q: How long does this take from start to finish?
A: Plan 10–15 minutes prep (slicing and breading) plus 20–25 minutes baking. Total about 35–45 minutes.
Q: Can I use chicken thighs instead of breasts?
A: Yes. Boneless skinless thighs are juicier but require slightly longer cooking depending on thickness. Aim for 165°F (74°C) internal temp.
Q: Is this recipe gluten-free?
A: Not as written, but easily adapted — swap in gluten-free flour and breadcrumbs.
Q: Can I bread the tenders ahead of time?
A: You can bread and refrigerate for up to 24 hours before baking. For best texture, don’t oil them until just before baking.
Q: What dipping sauce pairs best?
A: Honey mustard, ranch, barbecue, buffalo sauce, or a simple garlic aioli all work well — choose based on your flavor preference.
Conclusion
These baked chicken tenders are a reliable, weeknight-friendly solution when you want crisp texture without frying. For a recipe focused on extra crunch and a very similar oven method, check out Truly Crispy Oven Baked Chicken Tenders – RecipeTin Eats. If you’re curious about a no-breading oven-baked approach to compare textures and technique, see Oven Baked Chicken Tenders – JZ Eats.


Crispy Baked Chicken Tenders
Ingredients
Method
- Preheat the oven to 400°F (200°C). Line a baking sheet with parchment paper and set a rack if you have one.
- Set up the breading station: place the flour in one shallow bowl, beaten eggs in another, and mix breadcrumbs with garlic powder, paprika, salt, and pepper in a third.
- Pat the chicken strips dry with paper towels so the coating adheres. Dredge each strip in flour, shaking off excess.
- Dip the floured strip into the beaten eggs, letting the extra drip off.
- Press the strip into the breadcrumb mixture until evenly coated. Place the coated tenders in a single layer on the prepared sheet.
- Lightly spray the tenders with cooking spray or drizzle with a little olive oil.
- Bake for 20–25 minutes, flipping once about halfway through, until golden and the internal temperature reaches 165°F (74°C).
- Let tenders rest for 3–5 minutes before serving.


