Cheesy Beef and Bacon Pasta
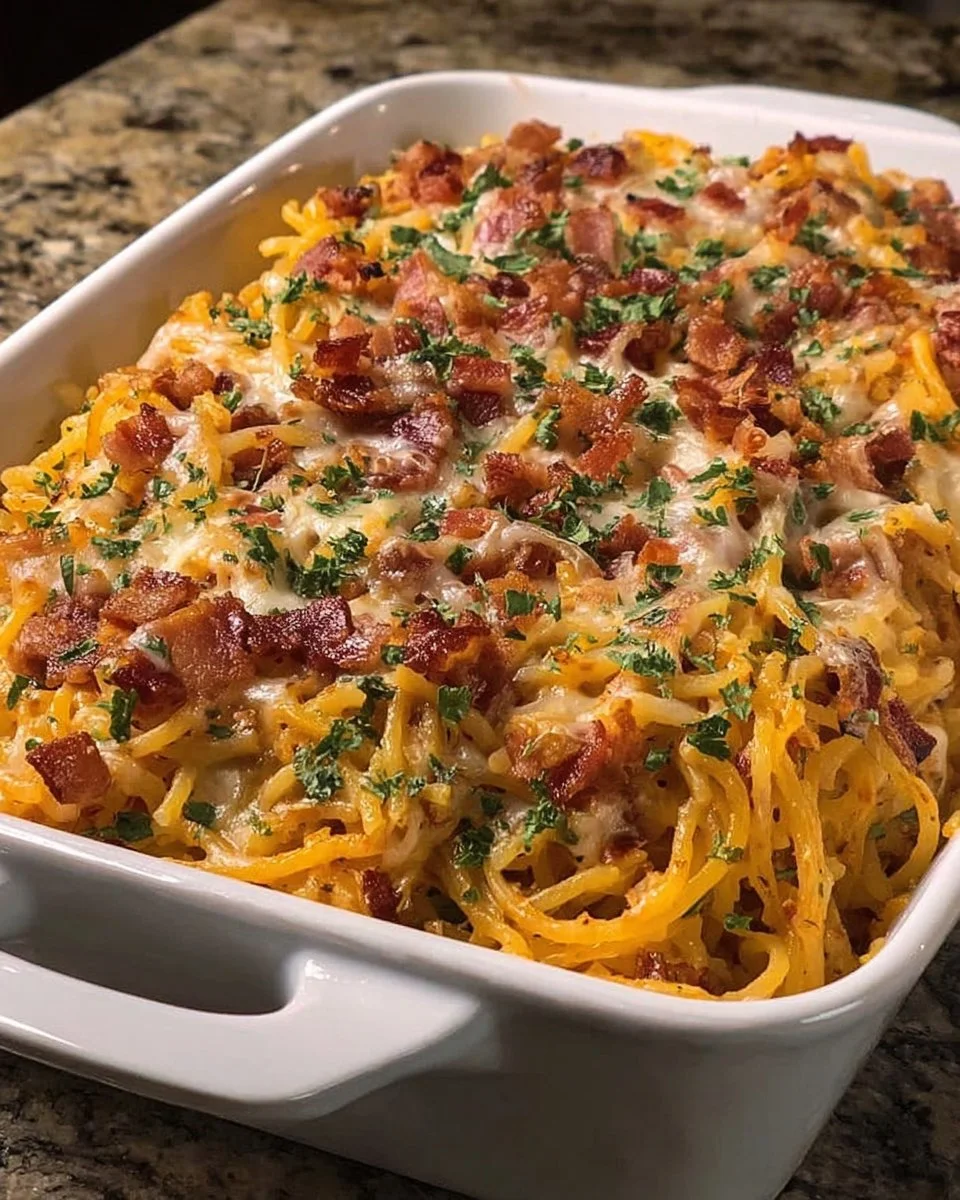

Introducing Cheesy Beef and Bacon Pasta
If you’re looking for a dish that combines comfort, richness, and flavor, cheesy beef and bacon pasta may just be the answer. This recipe is a delightful amalgamation of crispy bacon, savory ground beef, and creamy cheeses, making it perfect for family dinners or casual get-togethers. What makes this dish particularly special is its balance of hearty ingredients and rich flavors, coming together in a quick and satisfying meal that’s sure to impress. Trust me when I say that this is one recipe you’ll find yourself returning to time and time again.
Why You’ll Love This Dish
This recipe isn’t just about stellar taste—it’s designed for the modern home cook. Here are a few reasons to try it:
- Quick and Easy: You can whip this up in about 30-40 minutes, making it ideal for busy weeknights.
- Budget-Friendly: Using ground beef and bacon allows you to create a filling meal without breaking the bank.
- Kid-Approved: The combination of cheese and bacon is always a hit with the younger crowd.
- Versatile: This dish is perfect for any occasion, from a cozy family dinner to a potluck.
"I made this last week, and my kids couldn’t stop asking for seconds. It was a huge hit!" – Satisfied Chef
Preparing Cheesy Beef and Bacon Pasta: The Cooking Process Explained
Ready to dive into this culinary adventure? Here’s a quick look at how this dish comes together:
- Start by frying crispy bacon in a skillet and set aside.
- Brown your ground beef in the same skillet.
- Sauté onions and garlic before stirring in delicious seasonings.
- Combine all the sauces and creams for that luscious pasta sauce.
- Cook your spaghetti to perfection and mix it all together.
- Top with bacon, cheese, and bake to bring it all together.
- Finally, garnish with fresh chives and serve hot!
What You’ll Need


Gather these items before you begin your cooking journey:
- Ground beef chuck
- Thick cut bacon
- Yellow onion
- Garlic
- Spaghetti
- Heavy whipping cream
- Fire roasted diced tomatoes
- Tomato sauce
- Worcestershire sauce
- Unsalted butter
- Mild cheddar
- Parmesan cheese
- Colby jack cheese
- Fresh chives
- Cowboy butter seasonings (smoked paprika and dried herbs)
Pro Tip: Feel free to substitute ground turkey or a plant-based option if you’re looking for a lighter or vegetarian variant.
Step-by-Step Instructions
Here’s how to bring your cheesy beef and bacon pasta to life:
- Cook the Bacon: Slice the thick cut bacon into strips and cook in a large skillet over medium heat until crispy. Remove and crumble. Leave some bacon fat in the pan to enhance flavors.
- Brown the Beef: Add crumbled ground beef to the pan, cooking until browned. Drain excess grease if necessary.
- Sauté the Aromatics: Mix in diced onion and cook until translucent, then stir in minced garlic along with cowboy butter seasonings for that extra kick.
- Make the Sauce: Pour in fire roasted diced tomatoes, tomato sauce, Worcestershire sauce, and butter. Stir until smooth, lower the heat, and let it simmer after adding the heavy cream until it thickens.
- Cook the Spaghetti: Prepare spaghetti in salted boiling water until al dente, then fold it into the sauce. Stir in the grated cheeses until melted and creamy.
- Add the Bacon: Top the dish with crumbled bacon and transfer everything to a baking dish if desired. Bake at 375°F for about 10 minutes to let the flavors meld.
- Garnish and Serve: Finish by sprinkling chopped chives on top and serve hot, ready for everyone to dig in!
How to Plate and Pair
To elevate your serving experience, consider these ideas:
- Family Style: Serve the pasta directly from the baking dish for a casual, homey feel.
- Fancy Touch: Add a sprinkle of extra cheese on top before baking for a gourmet look.
- Side Dish Pairing: Pair with steamed broccoli or a fresh garden salad to balance the heaviness of the pasta.
- Wine Suggestions: A nice red wine, like a Merlot or Zinfandel, would complement the richness beautifully.
Keeping Leftovers Fresh
Storing and reheating your cheesy beef and bacon pasta is simple:
- Refrigeration: Store in an airtight container for up to 3-4 days in the fridge.
- Freezing: This dish freezes well! Portion it into freezer-safe containers and it will last for 2-3 months. Just ensure it’s cooled before freezing.
- Reheating: Reheat in the microwave or a stovetop over low heat, adding a touch of cream or milk to revive the creaminess.
Extra Advice for Success
Here are some handy tips to make your cooking process even smoother:
- Quality Matters: Use fresh bacon and good-quality beef for the best flavors.
- Prep Ahead: Chop all your ingredients before starting to streamline the cooking process.
- Customize Your Cheese: Mix and match your favorite cheeses; just be sure they melt well together.
- Taste as You Go: Always taste your sauce and adjust the seasoning before adding the pasta.
Creative Twists
Feeling adventurous? Here are some variations to consider:
- Spicy Kick: Add red pepper flakes or diced jalapeños for some heat.
- Veggie Boost: Throw in some fresh spinach or a medley of bell peppers for extra nutrients.
- Creamy Mushroom: Include sautéed mushrooms in the final mix for an earthy flavor profile.
Your Questions Answered
1. How long does this dish take to prepare?
This cheesy beef and bacon pasta usually takes about 30-40 minutes to make from start to finish.
2. Can I use different pasta?
Absolutely! Feel free to use any shape of pasta you have on hand—penne or fusilli works great too.
3. Is it safe to freeze leftovers?
Yes, it’s safe to freeze this dish! Just ensure it’s cooled down to room temperature before freezing to maintain quality.
If you’re ready to indulge in a creamy, cheesy, and meaty pasta dish, this recipe will undoubtedly exceed your expectations!

Cheesy Beef and Bacon Pasta
Ingredients
Method
- Slice the thick cut bacon into strips and cook in a large skillet over medium heat until crispy. Remove and crumble.
- Add crumbled ground beef to the pan, cooking until browned. Drain excess grease if necessary.
- Mix in diced onion and cook until translucent, then stir in minced garlic along with cowboy butter seasonings for that extra kick.
- Pour in fire roasted diced tomatoes, tomato sauce, Worcestershire sauce, and butter. Stir until smooth, lower the heat, and let it simmer after adding the heavy cream until it thickens.
- Prepare spaghetti in salted boiling water until al dente, then fold it into the sauce.
- Stir in the grated cheeses until melted and creamy.
- Top the dish with crumbled bacon and transfer everything to a baking dish if desired.
- Bake at 375°F for about 10 minutes to let the flavors meld.
- Finish by sprinkling chopped chives on top and serve hot.

